
Your arms, chest, and shoulders aren’t just for show. These muscles handle the daily grind of pushing, pulling, and lifting. Men often fixate on bulking their biceps and lats, but the benefits extend well beyond the mirror. Women gain significant structural advantages from toning these same areas, too. Specifically, strengthening your upper body can actually ease chronic back and neck pain.
The connection isn’t intuitive. A stronger upper body supports the spine, reducing strain on the lower back. Combine that with aerobic activity, and your metabolism shifts. You start burning more fat simply by having more muscle mass to maintain. It is a metabolic trade-off that favors long-term health over quick fixes.
“Strengthening the upper body with arm, chest, and shoulder exercises can ease back and neck pain in both sexes.”
The mechanics are straightforward. When your pectorals, deltoids, and triceps are developed, they stabilize the torso. This prevents compensatory movements that irritate the spine. If you are wondering where to start, push-ups are the foundational movement. They engage multiple muscle groups simultaneously without requiring equipment.
How Push-Ups Build Functional Strength
Push-ups are the benchmark for upper body endurance. They force your chest, shoulders, and arms to work in concert. This compound nature makes them efficient for those with limited time. You do not need a gym membership to reap these benefits. A floor and your own body weight are sufficient.
The movement pattern mirrors real-life tasks. Pushing a heavy door, lifting a child, or carrying groceries all rely on similar muscle recruitment. By mastering this exercise, you build resilience in the joints and connective tissues of the upper body. It is not just about aesthetics. It is about creating a chassis that can handle life’s physical demands without breaking down.
Building Arm Mass with Progressive Push-Ups
Push-ups are not just a warm-up exercise. They are a primary driver for developing the posterior deltoids, triceps, and upper chest. If your goal is visible, sculpted arms, this movement is foundational. The mechanics are simple, but the execution requires consistency. You don’t need equipment. You need volume.
The strategy is straightforward: perform as many repetitions as your body can handle with proper form, then increase that number over time. This is progressive overload applied to a bodyweight exercise.
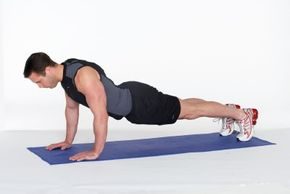
Step 1: The Starting Position
Position matters more than effort.
- Extend your legs fully.
- Place your toes on the floor.
- Set your hands on the ground directly under your shoulders.
- Keep your elbows extended.
Your core should be engaged. Think of your abs as a rigid plank. Your back must remain straight, creating a single line from your head to your heels. If your hips sag or your shoulders roll forward, you are moving weight away from the arms and into the lower back. Keep the line tight.
How to Perform Triceps Push-Ups Correctly
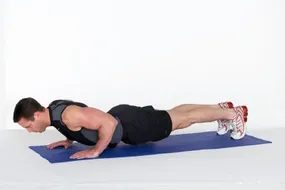
The second movement in this routine is all about control. Bring your elbows in close to your sides as you lower your body. Exhale as you push down. Do not let your lower back sag or arch. That puts stress on your spine instead of your arms.
Aim for eight repetitions. Once that feels manageable, scale up to three sets of eight.
Slowly bend elbows and lower body completely to the floor, exhaling on exertion. Don’t arch your back.
This specific variation targets the back of your upper arms more intensely than a standard push-up. If you struggle with balance or wrist pain, check out resources on home workout modifications or warm-up exercises to prepare your joints before tackling floor work.
Why Form Matters More Than Reps
It is tempting to rush. Do not. The eccentric phase, or the lowering part, builds strength just as much as the push up. If you bounce off the floor, you are losing tension where it counts.
For those looking to build a full body routine, consider adding:
- Leg Exercises for lower body stability
- Stretching sessions to maintain range of motion after intense sets
Note: This information is for educational purposes only. It is not medical advice. Consult your physician or a qualified healthcare provider before starting any new exercise regimen, especially if you have existing health conditions or injuries.
Tricep Conditioning and Wrist Safety
These movements target the triceps, the muscle group sitting on the back of your upper arm. If you feel pain in your wrists, stop immediately. Pushing through wrist discomfort can lead to injury.
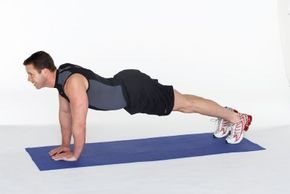
Setting Up for Arm Extensions
Position your body correctly before you start moving.
- Extend your legs fully.
- Keep your toes pressed into the floor.
- Place your hands on the ground.
- Extend your arms straight down, directly under your shoulders.
- Touch your index fingers together.
- Bring your thumbs into contact.
This hand positioning creates a stable base for the next phase of the routine.
Lowering Down: The Chest-Touch Variation
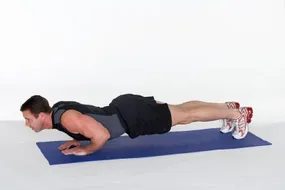
Get low. Elbows bend slowly, body drops toward the floor, chest hovering just above your hands. Keep your abs braced tight so your core doesn’t sag. Breathe out as you push the work out of your body. Do this eight times. Aim for three sets of eight as you build tolerance.
The movement is simple, but the alignment matters. If your hips float up or your lower back rounds, you are losing the integrity of the rep. Stay straight. Stay connected to the ground.
Intermediate Triceps Dips
This next move shifts the load entirely to your arms. It is harder than it looks, which is exactly why it works.
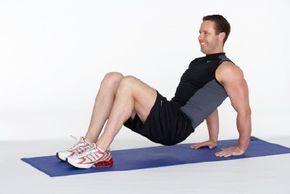
How to perform a modified tricep dip for beginners
If standard floor work feels unstable or the full range of motion is too easy, this variation serves as a specific entry point for upper arm strengthening. The setup is straightforward but requires attention to hand placement.
- Sit on the floor with knees bent and feet flat.
- Place hands behind you on the floor, fingers pointing toward your body.
- Lift your hips off the ground to start the movement.
This position shifts the load directly onto the triceps while keeping the spine neutral. It is a low-barrier option for those building the base strength needed before attempting more demanding variations.
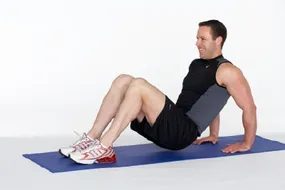
How to Perform Advanced Triceps Dips
Drop your body toward the floor. Keep your core braced tight. That tension matters. Your elbows bend slowly, no rushing.
Once you’re down, push back up by extending your arms fully. Do not let your shoulders hike up.
Repeat that motion eight times. Aim for three sets of eight as you build capacity.
This movement is a step up from standard variations. It demands more stability from your upper back and chest. If your form wobbles, scale back to a easier range of motion before adding reps.
Where This Fits in a Broader Routine
Triceps dips don’t exist in a vacuum. They pair well with:
- Home Workout circuits
- Warm-Up Exercises to prime the joints
- Leg Exercises for full-body balance
- Stretching to cool down the shoulder girdle
Skipping the warm-up because you’re “saving time” is how people end up with irritated elbows. Give your joints thirty seconds before you start loading them.
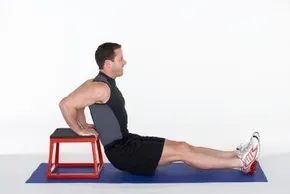
Step 1
Sit on the edge of a stool. Place your hands under your buttocks. Position your feet in front of you.
Keep your abdominal muscles tight. Lift your spine.
Because you are lifting your own body weight against gravity, this movement recruits more muscle fibers through a fuller range of motion. That makes the exercise more intense.
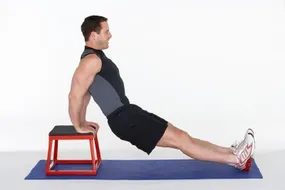
How to execute the tricep dip: bending elbows and straightening arms
The movement itself is deceptively simple. You slowly bend your elbows, lowering your body past the edge of the stool until you feel a stretch in the back of your arms. Then, you straighten your arms to push back up to the starting position. It is not about speed. It is about control.
- Repetitions: Aim for 8 to 12 reps in a single go.
- Progression: When that feels easy, increase it to 3 sets of 8 to 12 reps.
Why does this specific progression matter? Because your triceps are not just for looking good; they stabilize your shoulder and assist in pushing movements. If you skip the sets, you build endurance, but you might miss out on the raw strength gain that comes from structured volume.
Who is behind this routine?
Lisa Faremouth isn’t just writing from a desk. She is a certified exercise instructor and a member of both the American Council on Exercise and the Aerobic Fitness Association of America. Her background includes a silver medal in the Reebok National Aerobic 1989 Championships for the Midwest region. She also served as the director of exercise programs for a large health club in Chicago.
Now, she runs Fitfully Yours. Through that company, she provides education, consultation, training, and workshops to fitness centers, corporations, and individuals worldwide. So the advice here comes from someone who has actually directed exercise programs and competed at a high level, not just from a generic algorithm.
Where to go next if you want more than dips
If you found this useful, the source suggests checking out a few other areas.
- Home Workout routines for broader fitness.
- Warm-Up Exercises to prepare your body before the heavy work.
- Leg Exercises because you can’t have strong arms if your lower body is weak.
- Stretching to keep that range of motion you just worked for.
The dip is one piece. The whole puzzle is bigger.